Tutorial: Using the C51 compiler and the MP-51 Programmer


I. Introduction

The goal of this tutorial is to blink an LED using the 8051. Steps are given on how to compile the program using the c51 compiler, burn the program unto an 8051 chip, and run the program.
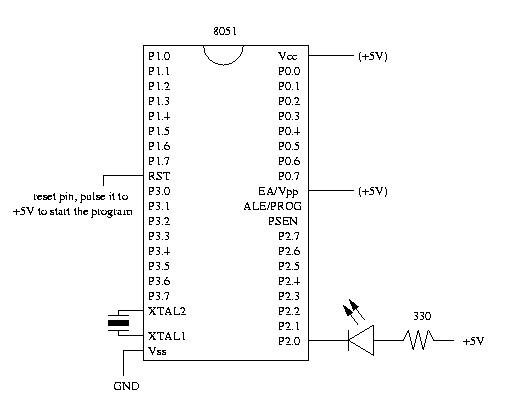
II. Schematic

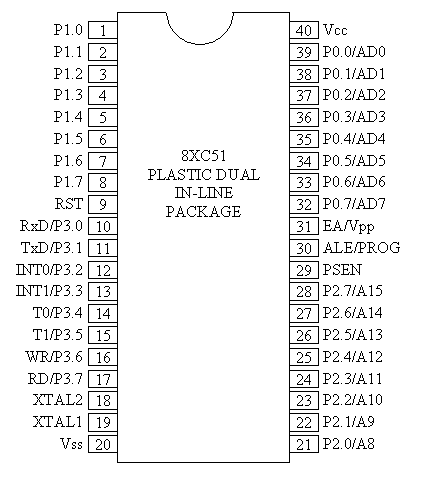
Wire the circuit as shown by the schematic below. It may be useful to used the 8051 pinout. Make sure the LED is connected correctly or it will not blink when you run your program. Below is another schematic 
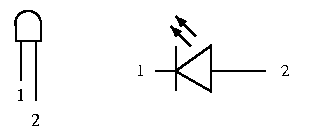
which shows how the LED corresponds to it's symbol.


Schematic for Tutorial


LED schematic

III. Apparatus Required

  1. LED (1)
  2. 330k resistor (1)
  3. 5V power supply
  4. 8051 chip

IV. Program


   /* main.c */

   #pragma SMALL DB OE
   #include <reg51.h>
   
   sbit light = P2^0;
   
   /* Delay Function */
   void delay(void){
      int i, j;
   
      for(i=0; i<1000; i++){
         for(j=0; j<100; j++){
            i=i+0;
         }
      }
   }
   
   void main(void){
      while(1){
         light=0;   /* turns light on */
         delay();   /* without the delay function the light
                       would blink to quickly for us to see */
         light=1;   /* turns light off */
         delay();
      }
   }

V. Procedure

Hardware

  1. Wire your board as shown in the schematic.
  2. Be careful that all power and ground connections are correct.
  3. Make sure you connected the LED correctly, if it is backwards, your LED will not blink.
  4. Check that your power supply is at 5 volts. If the voltage setting is too high, you will damage the 8051 chip.
Creating The Program File

  1. Map your network drive to P:\\Peart\cs122
  2. Run the batch file cs122.bat
  3. Create a folder in the C:\temp directory called tutorial
  4. Type in the following program into any text editor (i.e. notepad, wordpad, ...) and save to C:\temp\tutorial
  5. Open a Command Prompt and go to the file location, it should be at C:\temp\tutorial
  6. Compile the program by typing:

    • c51 tutorial.c

  7. If the compilation is sucsessful it should say:

    • C51 COMPILATION COMPLETE. 0 WARNING(S), 0 ERROR(S)

    If there are any warnings or errors, check the code you typed against the code provided.
  8. Upon sucsessful compilation, an object file is created. Link the object file to create an executable by typing:

    • bl51 tutorial.obj to tutorial.omf

    If you have multiple object files you can link them with the following command:

    • bl51 tutorial.obj, file1.obj, file2.obj to tutorial.omf

  9. Upon sucsessful completion an execuatable, tutorial.omf, should be created. You will see the following:

    • LINK/LOCATE RUN COMPLETE. 0 WARNING(S), 0 ERROR(S)

  10. You are now ready to create a hex file program with the following command:

    • oh51 tutorial.omf

  11. Copy your hex file unto a floppy

    • copy tutorial.hex A:\tutorial.hex

Burning A Chip - Programmer: MP-51

  1. Insert your disk into the disk drive
  2. Place the chip to be programmed on the slot making sure that the correct side is up.
    Note: there is a picture on the burner which shows which way to insert the chip.
  3. Use the arrow keys on the keyboard to choose options
  4. Choose Type -> 51Controller -> PC89C52U
  5. Choose File -> Load and enter the pathname of your hex file (i.e. A:\counter.hex)
  6. Choose Command -> Program -> DeviceMemory -> Program Device Memory
  7. The chip will be programmed. Remove it from the chip from the socket. It is now ready to be plugged into your board.
Testing Your Program
  1. Make sure that your chip has the power and ground connections as specified by the schematic.
  2. Connect pin 9 to ground.
  3. Supply power to your board (make sure the power supply is set to 5V, if it is higher you will damage the 8051 chip.)
  4. Pulse pin 9 to power then return it to ground.
  5. Your program should now be running. You should see the light blinking.