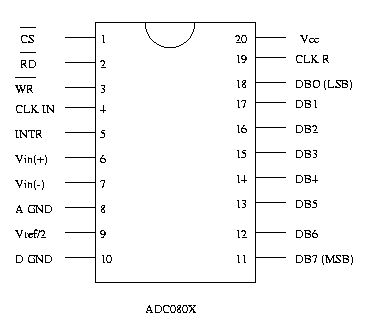
Figure 1. Pinout

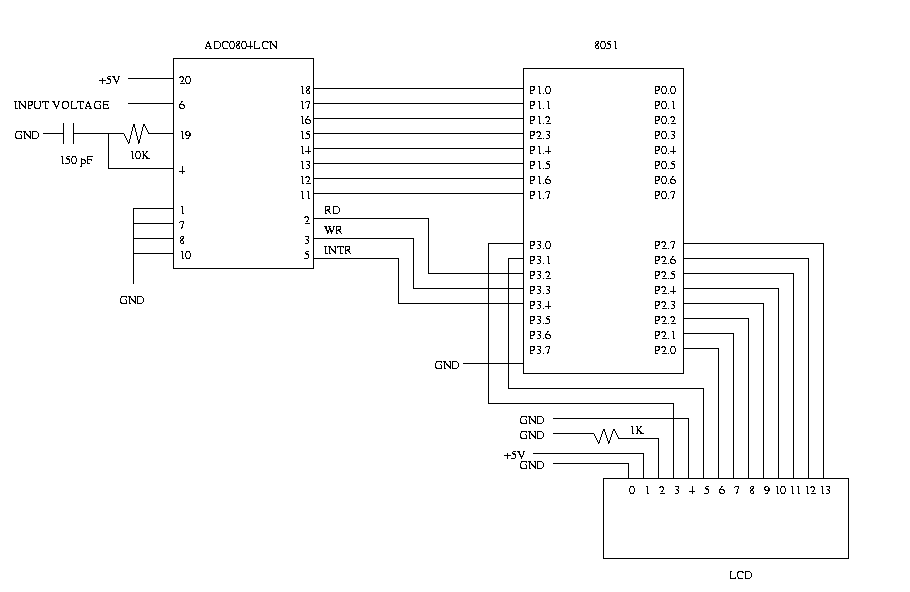
Figure 2. A/D Schematic
Analog to Digital Conversion
Introduction
To be able to implement analog to digital conversion using the ADC0804LCN 8-bit A/D converter. You will design a circuit and program the chip so that when an analog signal is given as input, the equivalent digital voltage is displayed on an LCD display. Thus, in effect, your circuit should function like a simple voltmeter.
The ability to convert analog signals to digital and vice-versa is very important in signal processing. The objective of an A/D converter is to determine the output digital word corresponding to an analog input signal.
The Datasheet for ADC0804LCN shows the pinout and a typical application schematic. The A/D converter operates on the successive approximation principle. Analog switches are closed sequentially by successive-approximation logic until the analog differential input volatge[Vin(+) - Vin(-)] matches a voltage derived from a tapped resistor string across the reference voltage.
The normal operation proceeds as follows. On the high-to-low transition of the WR input, the internal SAR latches and the shift-register stages are reset, and the INTR output will be set high. As long as the CS input and WR input remain low, the A/D will remain in a reset state. Conversion will start from 1 to 8 clock periods after at least one of these inputs makes a low-to-high transition. After the requisite number of clock pulses to complete the conversion, the INTR pin will make a high-to-low transition. This can be used to interrupt a processor, or otherwise signal the availability of a new conversion. A RD operation(with CS low) will clear the INTR line high again. The device may be operated in the free-running mode by connecting INTR to the WR input with CS=0.
Since this is an 8-bit A/D converter, a voltage from 0-5V. O will be repersented as 0000 0000 (0 in decimal) and 5V is represented as 1111 1111 (256 in decimal). To convert a value X volts to decimal, use the following formula:
          X * 5.0
          -------
            256
To get a better resolution, and display the vlaue as a floating point
number, you can multiply the numerator by a factor of 100, 1000 etc. and
then print the voltage accordingly.
Assignment:
Apparatus Required:
Schematic:

Figure 1. Pinout

Figure 2. A/D Schematic
Program:
#include <reg51.h>
#include "io.h"


sbit READ = P3^2; /* Define these according to how you have connected the */
sbit WRITE = P3^3;/* RD, WR, and INTR pins                                */
sbit INTR = P3^4;


void main( void ) {

	unsigned char adVal;
	unsigned long volts;
	InitIO();

	READ = 1;
	WRITE = 1;
	INTR = 1;
	ClearScreen();

        while(1) {

               /* Make a low-to-high transition on the WR input */

               while( INTR == 1 );    /* wait until the INTR signal makes  */
                                      /* high-to-low transition indicating */
                                      /* completion of conversion          */


                /* Read the voltage value from the port */
                READ = 0;
                adVal = P1;
                READ = 1;

                /* Compute the digital value of the volatge read */

                /* Print the value of the voltage in decimal form */
	}
}
Procedure: